Thursday, March 24, 2022

Spark SQL, Dataframe and Dataset


Spark: Spark SQL, Dataframe and Dataset

  1. RDD is low-level and type-safe API.
  2. RDDs are mainly for semi-structured and non-structured data but is easier to write inefficient code over RDD.
RDD operation
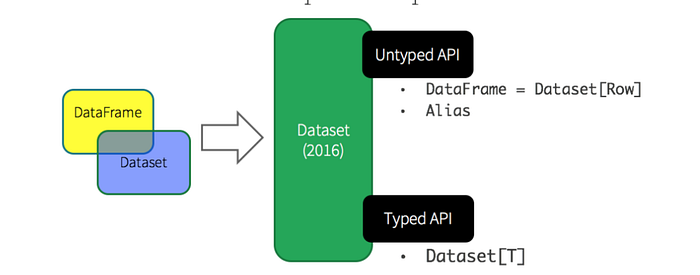
  1. DataFrame has Column and schema and structure data.
  2. Dataframe provides High-Level abstraction and provides DSL and query language to manipulate and extract data.
Dataset Operation
RDD vs DataSet GroupBy

DataSets

listingDS.groupByKey(ls => ls.zipCode).agg(avg($ “price”).as[Double])
val ds = spark.read.json(“/databricks-public-datasets/data/iot/iot_devices.json”).as[DeviceIoTData]
myDF.toDS /rdd.toDS
Typed Transformation on DataSet
groupByKey on DataSet
KeyValueGroupedDataset Aggeration Operation which Returns Dataset Back
agg(avg($"columnname").as[Double]) ---> Returns Dataset 
ReduceByKey using reduceGroups
Aggregator Function Contract
Implementing of Aggregate for string concatenate

Spark Basics : RDD ,Stages, Tasks and DAG


Spark Basics : RDDs, Stages, Tasks and DAG

val rdd = sc.textFile("/some_file",3)  
val lines = sc.parallelize(List("this is","an example"))
val rdd = sc.textFile("spam.txt")
val filtered = rdd.filter(line => line.contains("money"))
filtered.count()
New RDD is created after every transformation.(DAG graph)
DAGScheduler Transforming RDD Lineage(DAG) Into Stage DAG(Physical Execution Plan)
val input = sc.textFile("log.txt")
val splitedLines = input.map(line => line.split(" "))
.map(words => (words(0), 1))
.reduceByKey{(a,b) => a + b}
Shuffled RDD is created by reduceByKey wide transforamtion
val sfi  = sc.textFile("/data/blah/input").map{ x => val xi = x.toInt; (xi,xi*xi) }
val sp = sc.parallelize{ (0 until 1000).map{ x => (x,x * x+1) }}
val spj = sfi.join(sp)
val sm = spj.mapPartitions{ iter => iter.map{ case (k,(v1,v2)) => (k, v1+v2) }}
val sf = sm.filter{ case (k,v) => v % 10 == 0 }
sf.saveAsTextFile("/data/blah/out")

Wednesday, August 17, 2016

Delete Files Older than X Days and Delete Empty Folders

(1) Create a new text document (Del_OldDocs.txt)
(2) copy the script

REM Remove files older than X Days
forfiles -p "D:\Dir1\OldFolders" -s -m *.* /D -7 /C "cmd /c del @path"

cd /D    D:\Dir1\OldFolders
for /f "delims=" %%d in ('dir /s /b /ad ^| sort /r') do rd "%%d">NUL

(3) save the text document as Del_OldDocs.bat
(4) Run the script
(5) You can also run the script as job in the Task Scheduler


Note:
Please do some testing before using it in Production

D:\Dir1\OldFolders   -- this is the path where you have your old folders to be deleted
X Days -- Replace X with days (7 is used for one week), replace 7 with the number of days you want

First part of the script removes all the files in the OldFolders directory and Empty Folders still remain
Second part of the script will remove all the Empty Folders within OldFolders directory

Friday, June 10, 2016

Active Directory - Get account names, office and other properties from accountnames Powershell script

Using this script, you should be able to check and create Active Directory groups based on the input from spreadsheet (CSV)


  1. Copy the script in a notepad and save it as 'AD_DisplayNames_to_AccountNames.ps1'
  2. Use the same format for csv and add your DisplayNames and save it in the same folder as your script.
  3. Both script and csv are saved in the desktop
  4. Open powershell as Administrator (or ) Windows Powershell ISE that comes along with debugging. Using Powershell ISE can skip 5 thru 8 and open your script and hit F5
  5. In the powershell Navigate to your desktop (where script and csv are present)
  6. Set-ExecutionPolicy RemoteSigned
  7. Click Yes
  8. Now run the script by typing   ./AD_DisplayNames_to_AccountNames.ps1
  9. check for newly added txt and csv files for other properties in AD for the given displaynames


Powershell Script:

# Import active directory module for running AD cmdlets
Import-Module ActiveDirectory
$Sam = @()
$names = Import-csv "C:\Users\\Desktop\AD_input_DisplayNames.csv"


foreach ($name in $names)
{

$dispName = $name.displayname
$sam += get-aduser -filter  {displayname -like $dispName } -Property SamaccountName,DisplayName,office -Server ad3.xyz.com| Select DisplayName,SamaccountName,office


}
write-host $sam

#output to a text file format
$Sam | out-file 'C:\Users\\Desktop\AD_AccountNames.txt'
#output to a csv file format
$Sam | Export-Csv -Path 'C:\Users\Desktop\AD_AccountNames.csv'  -NoTypeInformation


Input:  (AD_input_DisplayNames.csv)

displayname
DisplayName1
DisplayName2


Output:  (AD_AccountNames.csv)

"DisplayName","SamaccountName","office"
"DisplayName1","accountname1","Office Name "
"DisplayName2","accountname2","Office Name "

Thursday, June 9, 2016

Bulk create Active directory groups and add users from csv - Powershell

Using this script, you should be able to check and create Active Directory groups based on the input from spreadsheet (CSV)


  1. Copy the script in a notepad and save it as 'Add_ADGroups_Members.ps1'
  2. Use the same format for csv and add your own groups and update csv based on your domain and path and save it in the same folder as your script.
  3. Both script and csv are saved in the desktop
  4. Open powershell as Administrator (or ) Windows Powershell ISE that comes along with debugging. Using Powershell ISE can skip 5 thru 8 and open your script and hit F5
  5. In the powershell Navigate to your desktop (where script and csv are present)
  6. Set-ExecutionPolicy RemoteSigned
  7. Click Yes
  8. Now run the script by typing   ./Add_ADGroups_Members.ps1
  9. check your AD groups getting created along with members added


Note: Users Domain is different to domain where groups are being created. You can have the same domain too, depending on your environment


# Import active directory module for running AD cmdlets
  Import-Module ActiveDirectory

    $Users = Import-Csv -Path "C:\Desktop\AD_input.csv"  
            
    foreach ($User in $Users)            
    {           
        $GroupName = $User.'GroupName'            
        $samAccountName= $User.'samAccountName'       
        write-host Current AD Group Name is $GroupName and accounts to add are $samAccountName
       
             
            Try
            {
              #Check if the Group already exists
              write-host checking to see if group $User.GroupName exists
              $exists = Get-ADGroup $User.GroupName
              Write-Host "Group $($User.GroupName) already exists! skipping group creation!"
         
            }
            Catch
            {
              #Create the group if it doesn't exist
                $create = New-ADGroup -Name $GroupName -GroupScope $User.GroupType -Path $User.GroupLocation -Description $User.GroupDescription
                Write-Host AD Group $GroupName created!
       
          
            }
            

         # Parse prospective members and add each to the new group. (multiple users to be added to same group)
         $Members = $User.samAccountName.Split(";")
      
         ForEach ($Member In $Members)
         {
             write-host Adding member  $Member
             $DomainGroupDN = Get-ADGroup -Identity $GroupName -Server ou.ad3.abc.com
             $SamDN = Get-ADUser $Member -Server ad3.abc.com
             Add-ADGroupMember $DomainGroupDN -Server ou.ad3.abc.com-Members $SamDN
             
             $Member = ""
         }
   

     Write-Host Members $Members added to Group $GroupName


}


Spreadsheet:   (save it as *.csv)
GroupName,GroupDescription,GroupType,GroupLocation,samAccountName
Test1,TestDescription1,DomainLocal,"OU=TESTOU,DC=ou,DC=ad3,DC=abc,DC=com","ramii;mreck"
Test2,TestDescription2,DomainLocal,"OU=TESTOU,DC=ou,DC=ad3,DC=abc,DC=com","larzi;mkhill"


Tuesday, May 31, 2016

Install ADUC on Windows 7 or Windows 10


Remote Server Administration Tool (RSAT) can be downloaded here
https://www.microsoft.com/en-us/download/confirmation.aspx?id=7887

(1) Download 64 bit or 32 bit depending on OS version installed on your computer

(2) After installing - to enable AD Management Tools

  1. From the Control Panel, click on Programs.
  2. Under Programs and Features, select Turn Windows features on or off.
  3. Under Remote Server Administration Tools > Role Administration Tools, select AD DS and AD LDS Tools


Click Ok. This will take a minute for windows to make changes to features


Thursday, May 22, 2014

SharePoint - Scroll To Top for Large Pages


Add this html to your SharePoint Page

<p id="page-top"><a href="#nav">Back to Top</a> </p>


Add below Style and Scripts to CEWP on your page.
 <script src="....//jquery-1.11.0.min.js"></script>

 <style>

#page-top {
                 position: fixed;
                bottom: 20px;
                right: 50px;
       }

#page-top a
{
background: #666;
text-decoration: none;
color: #fff;
width: 100px;
padding: 8px 0;
text-align: center;
display: block;
border-radius: 3px;
 
}

#page-top a:hover
{
text-decoration: none;
background: #999;
}

</style>


 <script>          
$(document).ready(function() {

//var scrollPosition = document.getElementById("s4-workspace").scrollTop;
//alert("Scroll Position: " + scrollPosition);
//$('#s4-workspace').animate({scrollTop:0}, 'fast');


var topBtn = $('#page-top');
                                 topBtn.hide();
$('#s4-workspace').scroll(function () {

   if ($(this).scrollTop() > 400) {
  topBtn.fadeIn();
} else {
  topBtn.fadeOut();
                    }
                 });


               topBtn.click(function () {
                $('#s4-workspace').animate({
                  scrollTop: '0px'
                 }, 500, "swing");
                return false;
           });


});
</script>

//(Tested in IE10, Firefox, Chrome)

Tuesday, February 18, 2014

Filter List items by Data Table - JQuery, REST API, AJAX and Datatables


Make a REST API call to retrieve SharePoint list items.
Returns JSON Objects array
Call DataTable to display in Tabular Format.
Add additional logic to show/hide additional details for a particular row.


Implementation:

(1) Create a list with Four columns and some test data Co11, Col2, Col3, Col4.
(2) Create a new page and add Script Editor WebPart.


<script type="text/javascript" charset="utf8" src="http://ajax.aspnetcdn.com/ajax/jQuery/jquery-1.8.2.min.js"></script>
<link rel="stylesheet" type="text/css" href="http://ajax.aspnetcdn.com/ajax/jquery.dataTables/1.9.4/css/jquery.dataTables.css">
<script type="text/javascript" charset="utf8" src="http://ajax.aspnetcdn.com/ajax/jquery.dataTables/1.9.4/jquery.dataTables.min.js"></script>


//Create User Interface to filter/search through results

Search for List of Technologies here:
<br></br> 
    <input type="text" id="techsearch" >
    <input type="button" value="Search" onclick="LoadTechnologies($('#techsearch').val());" >      
<br></br><br></br>


<div id="dynamictable"></div>


<br></br><br></br>


<style>
tr span.expand {
  width: 20px;
  height: 20px;
  background-image: url('http://www.datatables.net/release-datatables/examples/examples_support/details_open.png');
  display:inline-block;
  vertical-align: middle;
  margin-right: 5px; 
}

tr span.open {
  background-image: url('http://www.datatables.net/release-datatables/examples/examples_support/details_close.png'); 
}

div.expand-wrapper{
  white-space:nowrap; 
}

</style>


<script type="text/javascript">


$(document).ready(function(){

            var techsearch = null;  
            var data = null;
            var TechTable = null;
            LoadTechnologies(techsearch);


    });    //jquery function

    function LoadTechnologies(techsearch) {
               
    
      var data2 =  $.ajax(
       {
 //Build URL with select columns to display and can add additional filter by conditions
         url: _spPageContextInfo.webAbsoluteUrl + "/_api/Web/Lists/GetByTitle('ListName')/items?$select=Title,Vendor,Domain1,SubDomain1,ID,Description", 
         type: "GET",
        dataType: "json",
        headers: { Accept: "application/json;odata=verbose" }
   }
);// end ajax


     data2.done(function (data,textStatus, jqXHR)
      {
                                                
    var test2 = jQuery.parseJSON(  jqXHR.responseText.replace("]}}","]").replace("{\"d\":{\"results\":","")  );
                       // alert("First row title is: " + test2[1].Title);

// Cleanup - Remove any children under Dynamic Table (To remove results after first load)
 $("#dynamictable").children().remove();
//Create a Table interface depending on how you want to display returned list results            
                       $('#dynamictable').append('<table id="table1" cellspacing="0" cellpadding="4" width="100%"></table>');
                      
var table = $('#dynamictable').children();   
table.append("<thead><tr><td><b>Name of Technology </b></td> <td><b>Vendor</b></td>   <td><b>Domain</b></td>  <td><b>SubDomain</b></td>  <td></td>  </th></tr></thead><tbody></tbody>");


$(function()
                  {
     
                    
                        $.fn.dataTableExt.sErrMode = 'throw' ;

                        //Function formatting to show what additional details to show when you click to Expand
                        function fnFormatDetails(oTable, nTr) {
   
                              var aData = oTable.fnGetData(nTr);
                              var sOut = '<table cellpadding="8" bgcolor="rgb(255,160,0)" border="0" style="padding-left:50px;">';
                                  sOut += '<tr><td>Description: </td><td>' + aData.Description + '</td></tr>';
                           
           
                 return sOut;
                           }


                     //Binding to DataTable to show results in a tabular format
                        var TechTable = $('#table1').dataTable({
   
                                  
                                   sDom: '<"top"if>rt<"bottom"lp><"clear">',
                                  oLanguage:      {   sInfoEmpty: " ",
    
                                                       sZeroRecords: " No Technologies registered with the keyword you searched for",             
                                                       sSearch: "Filter Results:"
                                                }, 

                                   bDestroy:true,
                                   bJQueryUI: true,
                                   bProcessing: true,
                                   bFilter: true,
                                   bPaginate: true,   //pagination
                                   aaData: test2,      //test2 is parsed JSON data                                                      
                                   //aaSorting: [[0, 'desc']],
                                   aoColumns: [
                                                { mData: 'Title', bSearchable: true,  bSortable: true,
                                                   sContentPadding: "aaaaaaaaaaaaaa",
                                                   mRender:expandRenderer
                                                 },
                                                 { mData: 'Vendor'},
                                                 { mData: 'Domain1'},
                                                 { mData: 'SubDomain1'},
                                                 { mData: function (source, type, val)
                                                                {//Create Hyperlinks on returned data
                           return "<a href='Site/Subsite/TRTesting.aspx?BusinessUnit=" + source.ID + "' target='_blank'>Register</a>";
                                                                }
                                                 }           
                                               ] //end aoColumns
                                   });   // Techtable


                function expandRenderer(data, type, full)
                          {
                             // console.log(arguments);
                            switch(type) {
                   case 'display':
      return '<div class="expand-wrapper"><span class="expand"></span><span class="data">'+data+'</span></div>';
                 case 'type':
                 case 'filter':
                 case 'sort':
                               return data;
                       }  // end switch
                          }  // end expandRenderer

             
//For Show/Hide additional row details       
                 $('#table1 tbody').on('click', 'td span.expand', function() {
 
                                 var nTr = $(this).parents('tr')[0];
                                  if (TechTable.fnIsOpen(nTr))
                                   {
                                          $(this).removeClass('open');
                                         TechTable.fnClose(nTr);
                                   }
                                   else
                                   {
                                         $(this).addClass('open');
                                        TechTable.fnOpen(nTr, fnFormatDetails(TechTable, nTr), 'details');
                                      }
                               });


});  // end function


                   }); //end data2 done function


}

 
</script>


Additional Reference:
http://kalashnikovtechnoblogs.blogspot.in/2015/09/get-data-in-jquery-datatable-from.html

Friday, February 14, 2014

Hiding a Section based on Multi Select List Box selected value and Promoting it to a List


(1) Promoting
Create a Hidden field and calculate its value using the formula below and promote
eval(eval(MultiSelectField[. != ""], 'concat(., ", ")'), "..")


(2) Hiding section based on MSLB value
 when you set up the condition, select "Select a field or group..." from the left dropdown, select the MSLB's field, and before confirming the Select a Field or Group dialog, pick All occurrences of ___ from the dropdown(one more below).


Friday, January 10, 2014

SharePoint 2013 Rest API Filter Document Library by Title, Id, AuthorId, EditorId, GUID

To Show all the requests Created by logged in user in a Document Library


(1) By Author/Logged in user:

//Finding Id by logged in user: (In jQuery Document ready function)

var userId = _spPageContextInfo.userId;
// alert("User Id is: " + userId);

EndPoint:

"http://server/sites/subsite/_api/web/lists/getbytitle('DocLibName')/items?$select=Title,AuthorId, EditorId, Column1, Column2 &$filter= Author/Id eq " + userId

AuthorId = Created By
EditorId = Modified By
For filter use Author/Id 

(2) By Id
http://Server/sites/Site/_api/web/lists/getbytitle(DocLibName)/items('41')/File?$select=Title
  --- 41 is the Id

(3) By Guid
http://Server/sites/Site/_api/Web/Lists(guid'YourLibraryGUID')/Items/?$select=Title,Column1,Column2 &$filter= Author/Id eq 2

 --- Displays items Created by user with Id 2

Thursday, December 26, 2013

SharePoint 2013 Rest API Search through List and filter by multiple columns


(1) In the Webpart page, add a script editor webpart
(2) Paste the code shown below in the Editor.
(3) Search the Columns  ( * Filter by word containging the searched word in Column1 or Column2)
(4) Results shown in DataTable
(5) Search results can be filtered through another searchbox.
(6) Changes to be made are Highlighted in blue


Original Post by: Mark Rackley
http://summit7systems.com/who-needs-a-data-view-web-part-sharepoint-rest-and-datatables-net/


SearchList
Search through a list by Column1 or Column2


<!-- jQuery -->
<script type="text/javascript" charset="utf8" src="http://ajax.aspnetcdn.com/ajax/jQuery/jquery-1.8.2.min.js"></script>
<!-- DataTables CSS -->
<link rel="stylesheet" type="text/css" href="http://ajax.aspnetcdn.com/ajax/jquery.dataTables/1.9.4/css/jquery.dataTables.css">

<!-- DataTables -->
<script type="text/javascript" charset="utf8" src="http://ajax.aspnetcdn.com/ajax/jquery.dataTables/1.9.4/jquery.dataTables.min.js"></script>
       <input type="text" id="techsearch" >
       <input type="button" value="Search" onclick="LoadTechnologies($('#techsearch').val());" >


<table width="100%" cellpadding="0" cellspacing="0" border="0" class="display" id="TechTable">
    <thead>
        <th>Name of the Technology</th>
        <th>Vendor</th>
        <th>Green Listed</th>

    </thead>
</table>


<script type="text/javascript">

     function LoadTechnologies(techsearch)
      {
      
       alert("Searching by: " + techsearch + " through Technology Title and Vendor in List Name");
       var call = $.ajax(
                       {
                         url: _spPageContextInfo.webAbsoluteUrl + "/_api/Web/Lists/GetByTitle('ListName')/items?$select=Title,Vendor,GreenList&$filter=(substringof('" + techsearch + "', Title) or substringof('" + techsearch + "', Vendor))",
                         type: "GET",
                         dataType: "json",
                         headers: { Accept: "application/json;odata=verbose" }
                       }
        );// end ajax

      call.done(function (data,textStatus, jqXHR)
       {
         $('#TechTable').dataTable(
                       {
                        "bDestroy": true,
                        "bProcessing": true,
                        "aaData": data.d.results,
                        "aoColumns": [ { "mData": "Title" }, { "mData": "Vendor" }, { "mData": "GreenList" } ]
                        }); //end dataTable
       }); //end call done function
     
       call.fail(function (jqXHR,textStatus,errorThrown){ alert("Error retrieving Tasks: " + jqXHR.responseText); }); }
</script>

Tuesday, December 10, 2013

SharePoint 2013 new Menu bar - Using Script Editor CSS HTML


(1) Create a new sharepoint 2013 web page
(2) Add a script editor web part
(3) Insert the code below in the Script Editor
(4) Using F12 - IE Developer Toolbar identify the right DIV,UL,LI tags and change corresponding styles below.

Reference: http://www.mrc-productivity.com/techblog/?p=1049
Thanks to Steve.


<div id="wrap">
    <ul class="navbar">
    <li><a href="#">Home</a></li>
    <li><a href="#">Menu Item 2</a>
    <ul>
       <li><a href="#">2a</a></li>
       <li><a href="#">2b</a></li>
    </ul>        
    </li>
    <li><a href="#">Menu Item 3</a>
    <ul>
       <li><a href="#" >3a</a></li>
    </ul>        
    </li>
    <li><a href="#">Menu Item 4</a>
    <ul>
       <li><a href="#">4a</a></li>
       <li><a href="#">4b</a></li>
       <li><a href="#">4c</a></li>
    </ul>        
    </li>
    </ul>
</div>
<style>
#wrap {
 width: 100%; /* Spans the width of the page */
 height: 40px;
 margin: 0; /* Ensures there is no space between sides of the screen and the menu */
 z-index: 99; /* Makes sure that your menu remains on top of other page elements */
 position: relative;
 /*background-color: #366b82;*/
 }
.navbar {
 height: 40px;
        padding: 0;
 margin: 0;
 position: absolute; /* Ensures that the menu doesn’t affect other elements */
 border-right: 1px solid #54879d;
 }
.navbar li  {
   height: auto;
   width: 150px;  /* Each menu item is 150px wide */
   float: left;  /* This lines up the menu items horizontally */
   text-align: center;  /* All text is placed in the center of the box */
   list-style: none;  /* Removes the default styling (bullets) for the list */
   font: normal bold 12px/1.2em Arial, Verdana, Helvetica; 
   padding: 0;
   margin: 0;
   background-color: #FFA000;
                        }

.navbar a {    
  padding: 18px 0;  /* Adds a padding on the top and bottom so the text appears centered vertically */
  border-left: 1px solid #54879d; /* Creates a border in a slightly lighter shade of blue than the background.  Combined with the right border, this creates a nice effect. */
  border-right: 1px solid #1f5065; /* Creates a border in a slightly darker shade of blue than the background.  Combined with the left border, this creates a nice effect. */
  text-decoration: none;  /* Removes the default hyperlink styling. */
  color: white; /* Text color is white */
  display: block;
  }
.navbar li:hover, a:hover {background-color: #0023a0;}  /*54879d; light blue - #667BC6 */

.navbar li ul  {
  display: none;  /* Hides the drop-down menu */
  height: auto;      
  margin: 0; /* Aligns drop-down box underneath the menu item */
  padding: 0; /* Aligns drop-down box underneath the menu item */
  } 

.navbar li:hover ul  {
                        display: block; /* Displays the drop-down box when the menu item is hovered over */
                        }

.navbar li ul li {background-color: #0023a0;}   /*54879d */

.navbar li ul li a  {
  border-left: 1px solid #1f5065;
  border-right: 1px solid #1f5065;
  border-top: 1px solid #74a3b7;
  border-bottom: 1px solid #1f5065;
  }
 
.navbar li ul li a:hover {
  background-color: #667BC6;
  }   /*366b82;   light blue - #667BC6 */
</style>